Sidewalk Maintenance and Repair

December 2015

by Bill Christenson

Many of our residential neighborhoods and most municipal business districts have sidewalks along public right-of-ways providing public access throughout our communities.  Commonly, sidewalks are constructed with public funding by municipalities or as part of private site developments.  The general perception may be that maintenance and repair of these sidewalks is the responsibility of the city in which they are located, though this is not necessarily the case. 

The Revised Code of Washington (RCW) Chapter 35.69 allows city councils to place the duty, burden, and expense of sidewalk maintenance and repair upon the property owner directly abutting the improvement.  Several of our local cities including Seattle and Tacoma have adopted resolutions that require property owners to maintain sidewalks fit and safe for public travel.  The Seattle Department of Transportation and Tacoma Public Works Department identify several conditions for sidewalk repairs including:

·        Height differential or separation greater than ½”
·        Cracks, separation, or hole greater than 1” in width
·        Any piece of sidewalk that can be moved with ordinary foot pressure
·        Undermined sidewalks

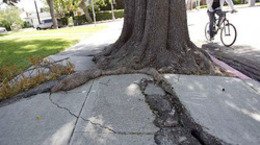
Sidewalk repairs may include concrete grinding, slab jacking, filling of cracks and holes, tree root maintenance with an authorized arborist, or complete removal/replacement of damaged walks.  Repairs must also be performed in accordance with city current standards.  Most repairs will necessitate hiring a competent concrete contractor.

Typically sidewalk damages caused by city trees are the responsibility of the city.  The City of Seattle maintains an inventory of “city” trees that can be viewed at http://www.seattle.gov/transportation/treeinventory.htm.  Sidewalk damage caused by private trees may be the responsibility of the property owner.

Be aware that as an owner of commercial or residential property in Washington State, you may be responsible to keep the adjacent sidewalk properly maintained and repaired.  Check with your local municipality regarding sidewalk maintenance and repair requirements in your city.


Cool Roofing

July 2015

by Bryce Given

Choosing a roofing type specifically for a flat roof is not an easy task for the uninformed. Over the past several years, there has been a push for lighter colored (cool) roofing.  Cool roofing is a hot topic when it comes to designing or replacing your home’s or commercial building’s roofing.  It is often considered because:

  •       designers and owners like the many color options beyond dark colored asphalt roofs
  •       many quality cool roofing products are offered
  •       ease of installation
  •       easily repaired
  •       long term material warranties
  •       relief of heat island effect above roofs

So, what is not so cool about cool roofing?  Through testing, field observations and published articles, roofing consultants and manufacturers are aware of a higher probability of condensation as a result of greater air temperature differences between joist cavities and the surface of the roofing.    Under these conditions there is an increased and prolonged ability for moisture to form under the roofing and in joist cavities.

Articles on roofing instruct that solar radiation is partially deflected from roofing surfaces, with the remaining radiation being absorbed into the roof and structure. With darker roofing, more heat is retained and greater drying in the joist cavity can occur.  Under cool roofing, less heat accumulates from absorption in the joist cavity.  This lower heat retention in the cavity space may lead to less drying and over time could cause greater buildup of moist air, which in turn condenses when it contacts a cooler surface such as the cool roofing or cooler roof sheathing.  Sufficient ventilation is critical to roofing and roof design, along with selection of the appropriate materials for the project.

The negative effects of cool roofing are most often seen on older buildings with insufficient roof ventilation, but can also be an issue in new construction if its unique properties are not properly taken into account in the design.  The roof membrane and underlayment are often specified along with building ventilation requirements, durability and aesthetic considerations. As a critical component of an integrated building system, roofing must meet building code and manufacturer specifications. 

Staples in underlayment construction

May 2015

by Michael Showalter

The use of pneumatically driven staples has grown exponentially since the 1970s when compressors and nail and staple guns were introduced into the construction industry. Staples are frequently used in everything from interior cabinet box construction to application of the exterior shingles.  What is frequently ignored is that staples vary in metal composition, gauge, crown width and length.  The variety of staple types may seem confusing but there is no one-size-fits-all in construction.

Recently we were asked to defend a staple manufacturer when it was alleged that their staples were withdrawing from a substrate and damaging the finished flooring.  In evidence was American Plywood Association (APA) rated subflooring and underlayment with staples that appeared to be backing out.

In the above referenced case, installers had used narrow crown staples to attach the APA underlayment prior to installing the finished floor. Most were apparently following the Component Panel Association (CPA) technical bulletins for Particle Board Underlayment Installation.  The CPA does allow the use of staples to attach particleboard underlayment, as long as the panel subfloors are at least 19/32” thick with a minimum of 32/16 panel span rating (if not glued).

CPA dictates that “galvanized, divergent, chisel point power driven staples may be used to attach particleboard underlayment”. Staples will vary in gauge, length and crown depending upon the thickness of the underlayment. Staples are to be placed 3 inches on center around the perimeter and 6 inches on center throughout the rest of the panel.

Conversely, in the mid-1980s the APA stopped giving guidance or recommendation to use staples to attach plywood or OSB panels.  The APA Engineered Wood Construction Guide gives instructions as to the selection of APA rated underlayment and the required method of fastening.  Nowhere in this manual is there mention of staples.  The use of staples to attach APA rated panels is not recommended nor advised.


Insurance Repair Estimates

June 2014

by Bryce Given

A fire, water leak or other damaging event to a building can be very disruptive and traumatic, and the repairs can be expensive.  In such times the help of knowledgeable consultants can give clarity, direction and assurance that important issues are being addressed.

The insurance provider’s adjuster will document the conditions and extent of the observable damage to the areas affected by the damaging event.  Based upon insurance coverage, the adjuster will present a written estimate calculating the amount of reimbursement for the repairs.  The estimate often shows the actual cash value (ACV), reimbursable cash value (RCV), deductibles, or all three. 

Many providers use an estimating program known as Xactimate.  Xactimate was developed for the insurance industry for the purpose of  standardizing the estimation of costs for repairs.  Xactimate unit prices are updated periodically to account for changes in labor and material costs. 

Providers often use estimating service companies to create the Xactimate for the loss reimbursement.Information provided on the Xactimate can be overwhelming, as it has hundreds of line item entries.

This often requires an independent experienced and trained consultant  to evaluate whether or not all issues are covered, including updating the structure to meet current Building Code and Energy Code requirements.  The consultant’s understanding of the means and methods of construction is invaluable when reviewing these Xactimates. He or she can provide a critical evaluation to determine a complete scope of recommendations for repairs and whether or not the Xactimate covers that scope. 

Should you ever be faced with having to review a Xactimate, consider having it reviewed by an independent construction consultant.

2012 Washington State Energy Code

January, 2014

By Bill Christenson

The 2012 Washington State Energy Code (WSEC) went into effect July 1, 2013.  This new WSEC is now based on the 2012 International Energy Conservation Code with State amendments.  For residential construction this means better air sealing of the exterior envelope, more efficient windows, tighter sealing of duct work, and more high-efficacy lighting fixtures, plus many other changes from the 2009 code. 

As part of the building air tightness requirements, the code now allows the local building official to require an approved third party to inspect all components of air barrier system and verify compliance.  Air leakage testing using the blower door method is also required after visual inspection of all sealing components.  Test reports must be provided to the code official.  Here again the local building official can require the testing be performed by an approved third party. 

Duct work, air handlers and furnaces are all required to be sealed for air leakage.  Similar to the 2009 WSEC, duct work is required to be leak tested by a qualified technician.  Allowable duct leakage thresholds are stricter in the current code.  Replacement of an existing furnace, air handling unit or air conditioning unit also triggers the duct testing requirement of the duct system connected to the new or replacement equipment. 

Building insulation requirements at floors, walls and ceilings are consistent with the 2009 code, although the necessity for continuous exterior insulation on walls has been reduced to four counties in eastern Washington versus twelve per the 2009 code.  Window efficiency requirements have been increased in the 2012 code calling for a U-factor of 0.30, up from the prior U-factor of 0.34.  Also, the code mandates that a minimum of 75% of permanently installed lamps in lighting fixtures shall be high-efficacy lamps, up from 50% in the 2009 code. 

Section R406 of the code addresses additional energy efficiency requirements and mandatory energy credit criteria.  A typical single family residence (1500 sf – 5000 sf) now requires 1.5 energy credits in lieu of 1.0 credits previously.

Be informed and understand how the new code effects your project.  You can view the entire 2012 WSEC for residential construction at: www.energy.wsu.edu/BuildingEfficiency/EnergyCode.aspx